
Krugersdorp North’s Heidi Coetzee and Ruimsig’s Elanie Pelser are inspiring the viewers of the third season of kykNET‘s reality show, Kunsvlyt to get arty. They share their DIY projects you can do at home.
Heidi shared her latest DIY project with us
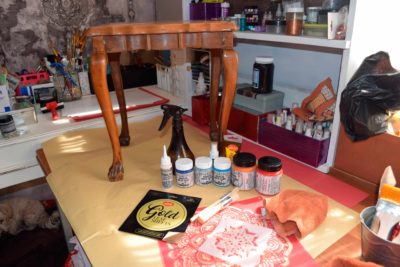
Every household has once owned ball and claw furniture and Heidi showed us how to jazz up these forgotten pieces of furniture.
YOU WILL NEED:
Small antique ball and claw table; chalk paint in Chilli Red, Fountain Blue, Dusk Blue, Meadow Grey, Yellow and Mint; stencil glue; several sheets of copper leaf; soft and dark wax; a broad, flat paintbrush and two flat, round stencilling brushes; a medium-sized flat palette knife; a medium-sized mandala stencil; sandpaper; a spray bottle with water; and lots of old rags.
HOW TO:
Roughly paint the whole table with the Dusk Blue chalk paint, leaving some of the original wood exposed and leave to dry.
Starting with the tabletop, dip the palette knife into the Chilli Red paint, then drag and scrape the paint in different directions over the surface. While you drag and scrape the paint, spray water over the wet paint and use your finger to move the paint around. Pour the other colours onto a palette or plastic plate, then randomly dip the palette knife into each colour and repeat the same technique over the table surface. The result will be a swirling mass of colour.
Repeat the process on the rest of the table. Let the paint dry completely.
Sand the top of the table lightly and distress some of the edges.
Place the mandala stencil where you want the pattern on the tabletop, and use a stencilling brush to apply a thin layer of stencil glue onto the stencil. Remove the stencil and apply the copper leaf to the glued area.
Using the flat stencil brush, roughly apply a thin layer of stencil glue to the ball and claw parts of the feet, but don’t cover them completely, because you want a rustic effect. Apply pieces of copper leaf randomly to the glued area, and let the glue dry.
Using the other stencil brush, brush over the copper leaf on the mandala, applying a bit of pressure to loosen the copper where it is not glued down. Keep brushing until the mandala pattern is completely visible. Repeat the same technique on the ball and claw copper leaf sections.
Using the same round stencil brush, cover the whole table with the clear soft wax and wipe the excess off gently with a soft cloth. Repeat the technique with the dark wax, wiping the excess dark wax off with a cloth.
Leave to cure for about 24 hours.
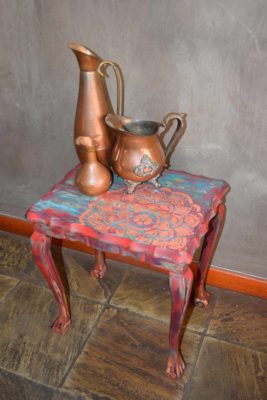
You can vary this project by simply changing the colours or the stencil. What are you waiting for? Grab your art supplies, take your dusty ball and claw table out of storage and give it new life!
Elanie shows us her DIY laundry basket
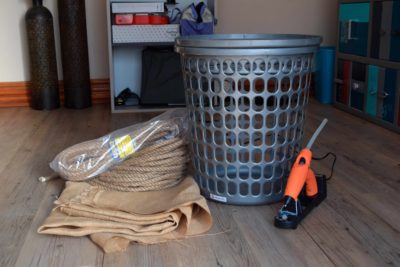
Rope has such a rustic appeal, so if you are looking for nice rustic bedroom décor, this DIY laundry basket will fit in perfectly. You make this one by covering a cheap plastic laundry basket with rope … So grab the glue gun and go!
YOU WILL NEED:
• Laundry basket
• Approximately 1,2m hessian or fabric
• Glue gun and glue sticks
• 15m rope
• Paintbrush
• Three or four shades of paint in the colour you want
HOW TO:
Cover the basket with fabric using the glue gun to secure flat edges. * Hint: place the basket up-side-down on the floor.
Wrap the rope around the basket from the bottom to the top, glueing every third row. * Hint: start inside the edge and glue all around.
Start with the darkest colour and dry-brush a broad section around the basket. Paint from dark to lighter shades up the basket to create an ombré effect.
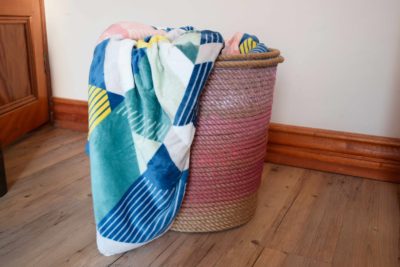
Your beautiful new basket can still be used as a laundry basket or you can use it to store towels, blankets or toys.
Text and images: JACO-MARI FUTCHER.

