
Yes, we know. Wors and a chop makes for a happy chap. But let’s go a little more glam this Heritage Day.
Forget the common cheese, tomato and onion braaibroodjie. Let’s get a little more classy, with these ideas from Jan Braai (he even shares some tips with us).
Fig and feta braaibroodjie
In the Western Cape, we like to serve things with preserved green figs, and usually there will be cheese involved as well. The odds of being served preserved figs and cheese as a snack before your meal is about as high as being served preserved figs and cheese as dessert (similar, but in a different way, to brandy and coke at many braais in South Africa). It’s a flavour combination that simply works. So here we are making the preserved figs and cheese the main actors, right in the centre of the braaibroodjie. No surprises then that the result works equally well as a starter, main meal or dessert!
What you need:
(makes 6)
12 bread slices
butter or olive oil
2 red onions (sliced into rings)
240 g mozzarella cheese (grated)
1 small tub (200 g) black pepper-flavoured feta cheese (crumbled)
8 preserved green figs (chopped)
What to do:
- Caramelise or brown the sliced onions with a bit of oil or butter in a pan or pot on the fire or stove.
- Build the braaibroodjies: Spread butter or olive oil on one side of each slice of bread (these sides will be outward-facing in the assembled braaibroodjie). Pack half these slices buttered-side down and evenly distribute the caramelised onions, grated mozzarella, crumbled feta and chopped figs between the six laid-out slices of bread. Close the braaibroodjies with the remaining bread slices, buttered sides facing upwards.
- ‘Braaibroodjies is draaibroodjies’. Braaibroodjies should be turned often and are braaied in a closed, hinged grid. If you don’t have one, buy one – preferably with adjustable heights to compress each unit perfectly. You want medium-paced, gentle heat and the grid should be relatively high. Your aim is for the cheese to be melted and all other fillings to be completely heated by the time the outsides are golden brown. Slightly opening and closing your hinged grid a few times after each of the first few turns of the braai process helps the braaibroodjies not to get stuck to the grid.
- Once done, slice each braaibroodjie in half. Generally, I believe that the correct way to slice braaibroodjies is diagonally and the correct time to serve is immediately.
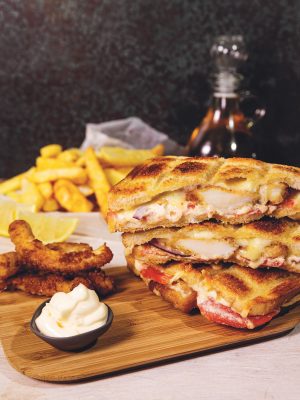
Calamari Braaibroodjie
On surf and related trips, calamari burgers are nothing new: Freshly fried calamari on a hamburger roll with some sauce. This recipe is just a more advanced and refined version based on the same principle. We’re adding another layer of crisp (the outsides of the braaibroodjies) and a very welcome layer of melted cheese. What you need to pull this one off effortlessly is a portion of warm, freshly fried, tender calamari in close proximity to a place where you can braai. Fortunately, South Africa’s vast coastline is completely littered with exactly that – fish and chips shops and public picnic braai areas.
What you need:
(makes 6)
12 bread slices
butter or olive oil
½ cup mayonnaise
2 tomatoes (sliced)
1 onion (sliced)
salt and pepper
1 generous portion of fried calamari (from the fish and chips takeaway shop)
240 g Cheddar cheese (sliced or grated)
What to do
- Build the braaibroodjies: Spread butter or olive oil on one side of each slice of bread (these sides will be outward-facing in the assembled braaibroodjie). Pack half these slices buttered-side down and spread with a layer of mayonnaise, tomato and onion, and season with salt and pepper. Equally distribute the calamari between all of these and cover with cheese. Close the braaibroodjies with the remaining bread slices, buttered sides facing upwards.
- ‘Braaibroodjies is draaibroodjies’. Braaibroodjies should be turned oftenand are braaied in a closed, hinged grid. If you don’t have one, buy one – preferably with adjustable heights to compress each unit perfectly. You want medium-paced, gentle heat and the grid should be relatively high. Your aim is for the cheese to be melted and all other fillings to be completely heated by the time the outsides are golden brown. Slightly opening and closing your hinged grid a few times after each of the first few turns of the braai process helps the braaibroodjies not to get stuck to the grid.
- Once done, slice each braaibroodjie in half. Generally, I believe that the correct way to slice braaibroodjies is diagonally and the correct time to serve is immediately.
Mushroom braaibroodjie
Mushrooms impart the savoury fifth-flavour element called umami to any food you add it to. This is a fact. My opinion is that speaking about umami in a recipe, particularly in the introduction of a recipe, is very poncy, so we’re not starting off well here. There is method to the madness though, as my point is that this is the reason mushrooms are one of the big-three additions to recipes. It simply does not matter how well balanced, tried, tested and researched a recipe is; there will always be a clown suggesting that it could be improved by adding one of the big three – the big three being bacon, cream and mushrooms. Whatever you do, somebody will want to add one of them. And so it follows that I don’t think we should be adding mushrooms into other well-constructed braaibroodjies. I am of the firm belief that you should simply make a mushroom-dedicated braaibroodjie to let this culinary superstar shine on its own stage. The flavour of mushrooms intensifies when you pan-fry them, so before using them as filling for you braaibroodjie, that is definitely what you want to do.
What you need:
(makes 6)
12 bread slices
butter or olive oil
1 red onion (sliced)
2 punnets (500 g) mushrooms (I recommend a mix of portabellini and white button mushrooms, roughly chopped)
2 garlic cloves (crushed and chopped)
ground black pepper
plain cream cheese (1 tub will be enough)
240 g Cheddar cheese (sliced or grated)
What to do:
- Heat some butter or oil in a pan on the fire and fry the onion and mushrooms until they go soft and then golden brown. Add the garlic and pepper and fry for another minute.
- Build the braaibroodjies: Spread butter or olive oil on one side of each slice of bread (these sides will be outward-facing in the assembled braaibroodjie). Pack half these slices buttered-side down and spread cream cheese on all the slices. Then add a layer of the mushroom mixture and Cheddar cheese. Close the braaibroodjies with the remaining bread slices, buttered sides facing upwards.
- ‘Braaibroodjies is draaibroodjies’. Braaibroodjies should be turned often and are braaied in a closed, hinged grid. If you don’t have one, buy one – preferably with adjustable heights to compress each unit perfectly. You want medium-paced, gentle heat and the grid should be relatively high. Your aim is for the cheese to be melted and all other fillings to be completely heated by the time the outsides are golden brown. Slightly opening and closing your hinged grid a few times after each of the first few turns of the braai process helps the braaibroodjies not to get stuck to the grid.
- Once done, slice each braaibroodjie in half. Generally, I believe that the correct way to slice braaibroodjies is diagonally and the correct time to serve is immediately.
And for the sweet tooth:
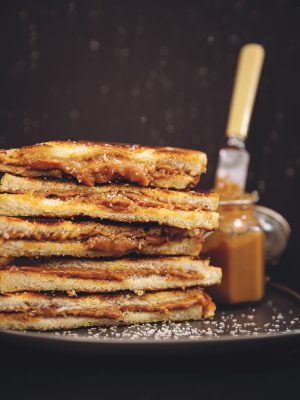
Caramel braaibroodjie
In theory, you could slowly simmer a tin of condensed milk to produce caramel and then use that but in reality, you can just buy a tin of caramel so we are cutting straight to that point. This recipe is inspired by the Argentine alfajor snack and may inspire you to eat caramel shamelessly, at any time of day, just like the people in Argentina. At first, you might wrongly think this is just a dessert braaibroodjie. In actual fact, it can be successfully served for breakfast and also absolutely any other time of the day; for example, in the mid-morning or mid-afternoon with tea.
What you need:
(makes 6)
12 bread slices
butter
1 tin caramel
2 tots desiccated coconut
WHAT TO DO
- Build the braaibroodjies: Spread butter on one side of each slice of bread (these sides will be outward-facing in the assembled braaibroodjie). Pack half these slices buttered-side down and spread with a layer of caramel. Sprinkle coconut on that. Close the braaibroodjies with the remaining bread slices, buttered sides facing upwards.
- ‘Braaibroodjies is draaibroodjies’. Braaibroodjies should be turned often and are braaied in a closed, hinged grid. If you don’t have one, buy one – preferably with adjustable heights to compress each unit perfectly. You want medium-paced, gentle heat and the grid should be relatively high. Your aim is for the caramel to be completely heated by the time the outsides are golden brown. Slightly opening and closing your hinged grid a few times after each of the first few turns of the braai process helps the braaibroodjies not to get stuck to the grid.
- Once done, slice each braaibroodjie in half. Generally, I believe that the correct way to slice braaibroodjies is diagonally and the correct time to serve these is immediately, with a cup of tea.
Marshmallow and chocolate braaibroodjie
Braaing marshmallows on skewers over some gentle heat is nothing new. I believe it’s vital to the braai development of the youth that they do this often, as it teaches them all the fundamentals on how to braai the more tricky items, like – case in point – braaibroodjies, and things like chicken. Gentle heat and turn often. You need the insides cooked before the outside is burnt. So we know braaied marshmallows are a winner. And I have championed the chocolate braaibroodjie as a dessert of connoisseurs for a few years now. It logically follows that the Marshmallow and Chocolate Braaibroodjie not only works, but works very well. It’s a relatively easy braaibroodjie to braai because both marshmallow and chocolate are quite happy to melt quickly, so you’re quite likely to have the insides melted by the time the outsides are golden brown. And the bonus: constructing them is very straightforward as well when the crowd is baying for something sweet after a great meal.
What you need:
(makes 6)
12 bread slices
butter
1 packet (150 g) marshmallows
2 slabs (100 g each) chocolate of your choice (roughly chopped)
What to do:
- Cut the marshmallows in half and roughly chop the chocolate.
- Build the braaibroodjies: Spread butter on one side of each slice of bread (these sides will be outward-facing in the assembled braaibroodjie). Pack half these slices buttered-side down and layer with marshmallow and chocolate. Close the braaibroodjies with the remaining bread slices, buttered sides facing upwards.
- ‘Braaibroodjies is draaibroodjies’. Braaibroodjies should be turned often and are braaied in a closed, hinged grid. If you don’t have one, buy one – preferably with adjustable heights to compress each unit perfectly. You want medium-paced, gentle heat and the grid should be relatively high. Your aim is for the chocolate to be melted and the marshmallows puffed and melted by the time the outsides are golden brown. Slightly opening and closing your hinged grid a few times after each of the first few turns of the braai process helps the braaibroodjies not to get stuck to the grid.
- Once done, slice each braaibroodjie in half. Generally, I believe that the correct way to slice braaibroodjies is diagonally and the correct time to serve is immediately.
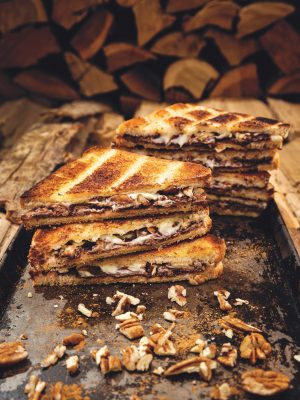
Chocolate braaibroodjie
The Chocolate Braaibroodjie got its first taste of public acclaim and fame when I made it on the Jan Braai vir Erfenis television show quite a few years ago. The day after the show aired, suburban supermarkets had a sudden and unexpected run on sliced white bread and chocolate spread! Fortunately, not everyone reads books at exactly the same time so demand should be more measured now.
What you need:
(makes 6)
12 bread slices
butter
1 jar Nutella or similar chocolate hazelnut spread (you will not use all of it)
100 g slab white chocolate (finely chopped)
50 g pecan nuts (more if you like more, finely chopped)
½ cup sugar
1 tsp cinnamon
What to do:
- Build the braaibroodjies: Spread butter on one side of each slice of bread (these sides will be outward-facing in the assembled braaibroodjie). Pack half these slices buttered-side down and spread with a layer of Nutella. Cover the Nutella slices generously with chopped chocolate and pecan nuts. Close the braaibroodjies with the remaining bread slices, buttered sides facing upwards.
- ‘Braaibroodjies is draaibroodjies’. Braaibroodjies should be turned often and are braaied in a closed, hinged grid. If you don’t have one, buy one – preferably with adjustable heights to compress each unit perfectly. You want medium-paced, gentle heat and the grid should be relatively high. Your aim is for the chocolate to be melted by the time the outsides are golden brown. Slightly opening and closing your hinged grid a few times after each of the first few turns of the braai process helps the braaibroodjies not to get stuck to the grid.
- Just before they are done, mix the sugar and cinnamon together and sprinkle the sugar over the toasted bread. Toast on the fire again on both sides for 1–2 minutes.
- Once done, slice each braaibroodjie in half. Generally, I believe that the correct way to slice braaibroodjies is diagonally and the correct time to serve is immediately.
Jan’s hints and tips
Your bread should be buttered (or use olive oil for the savoury versions) on the outside only. “Braaibroodjies is draaibroodjies. Braaibroodjies should be turned often and are braaied in a closed, hinged grid. If you don’t have one, buy one – preferably with adjustable heights to compress each unit perfectly. You want medium-paced, gentle heat and the grid should be relatively high. Your aim is for the cheese (or chocolate or caramel in the case of the sweet versions) to be melted and all other fillings to be completely heated by the time the outsides are golden brown. Slightly opening and closing your hinged grid a few times after each of the first few turns of the braai process helps the braaibroodjies not to get stuck to the grid. Once done, slice each braaibroodjie in half. Generally, I believe that the correct way to slice braaibroodjies is diagonally and the correct time to serve is immediately.”

All recipes are from Braaibroodjies and Burgers by Jan Braai, published by BookStorm, around R370 from good bookstores and online. Also available in Afrikaans as Jan Braai: Braaibroodjies en Burgers.

