The Easter weekend takes place from April 10 to April 12 and, while this year we may not be able to visit family and friends or host those customary lunches, we can certainly celebrate at home with dishes both traditional and modern.
We asked the chefs from the various Capsicum Culinary Studios campuses what they will be preparing, serving and eating at their Easter tables this year and also asked them to share a recipe.
Chef Eoin Shiell, from the Pretoria campus and winner of the Capsicum Chef Lecturer of the Year, revealed he would be doing something slightly unusual but still keeping with an egg theme and making his easy-to-make and utterly delicious egg ravioli.
“This is a very different, but amazing recipe that can be served family style or plated for a more formal/fancy dish. It’s rich, sumptuous without actually being expensive or overly complex and features ingredients most should have at home.” said Shiell.
“It can be served as part of a bigger dish or even enjoyed for breakfast.”
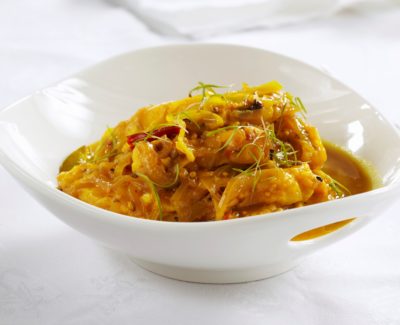
Cape Town campus chef Jaco Page says he always whips up a batch of his much-loved pickled fish for Easter.
“My family can’t get enough of it,” he says, “and are always pleading with me to make it, so they are especially happy when Easter comes around and they know that there is going to be a big platter of it gracing the centre of our table.”
For Bernice Warner from Capsicum’s PE campus, nothing says Easter more than royal iced cookies.
“These are easy and fun to make and you can get the whole family involved when it comes to the icing,” said Warner.
“Give each member of the family a piping bag and icing and let them create their own designs – whether it be chicks or bunnies or even Easter eggs.”
The recipes:
Egg Yolk Ravioli by Chef Eoin Shiell
(Cooking time: 2 hours)
Pasta Dough
- 500g cake flour
- 2 whole eggs
- 3½ egg yolks
- ¼ cup warm hot water
- 1 tablespoon olive oil
- Pinch of salt
- Flour for rolling
- Water, olive oil and salt for boiling.
Egg yolk filling
- 5+ egg yolks (make sure not to break the yolks)
- 150ml cream
- ½ teaspoon red wine vinegar/Sherry/Brandy
- Touch finely chopped garlic
- Touch salt
- Touch black pepper
- Truffle oil optional
- Egg wash
- Piping bag/Ziplock bag
- Crispy fried basil or sage for plating
- Grated or shaved parmesan for plating
- Olive oil for plating
- Flaked/rock salt for plating
Method
For the Pasta Dough
- Place the flour and salt into a large mixing bowl and create a well in the centre. In a separate bowl mix the eggs and whisk well.
- Tip the eggs into the well created and either using your hands or a fork mix the flour into the eggs a little at a time.
- At about the midway point add the water and olive oil and mix well till the dough forms a ball.
- Once the dough forms a ball, turn out onto your workstation and start kneading. If it is too wet/sticky add a bit more flour, if too dry add a touch water to help bind it.
You will have to work/knead the pasta for about 10 minutes till it forms a smooth, soft ball. Once formed wrap well in plastic wrap and store in the fridge for at least 1 hour. - Remove the dough from your fridge and let it stand at room temperature for 10 minutes as this makes it easier to work with. Cut into two halves, when not working with the dough always keep it completely covered as it will start to oxidise and dry out.
Roll the dough out using a floured pasta machine to the third last setting and lay out onto your floured work surface. Repeat with the other ball of pasta. It helps to fold the pasta over itself when running the pasta through the machine on the first 3 settings as this helps strengthen the dough.
If you don’t have a machine you will have to roll the pasta out by hand as thin as possible on a floured surface. - Lay the rolled-out sheets onto your cleaned floured surface ready to place your filling.
For the Egg Yolk Filling
- Gently heat your cream and garlic and remove from the heat. Place into a large bowl and cool in the fridge for 20 minutes.
- Remove from the fridge add your vinegar/sherry/brandy, truffle oil and seasoning.
- Whisk the cream till it is at stiff peak and place into your piping bag.
- Seal piping bag well and store in the fridge till ready for use.
To Assemble the Ravioli
On one sheet of pasta, equally spaced out, pipe your flavoured cream as this is used to stabilise the egg yolk. Make sure you pipe a circle that is wide and high enough for you to place and stabilise the egg yolk in.
Carefully place the egg yolk in the centre of the cream, keep it in a bowl as it makes it easier to tip out. Egg wash all around the filling. Repeat for as many as required, making sure they are equally spaced. If the yolk breaks you will have to start again.
Carefully lay the other sheet of pasta over the filling and carefully shape and press down.
To remove excess air, find a ring cutter that just fits around the filling and turn over, using the blunt side to press out excess air and help shape the ravioli.
Stamp/cut out the ravioli using your larger ring cutter. Make sure to use a fork to crimp/close the seal all around the ravioli and then with a slightly smaller cutter you can choose to cut off the excess and untidy pasta.
Lay onto a tray with grease proof paper and dusted with flour.
Place into the boiling water and cook till the pasta is al dente-roughly 3 minutes. Remove with a slotted spoon and place onto a greased tray to drain well. If the pasta breaks or gets pierced you can’t use it, so be very careful. We want perfectly cooked pasta and a runny egg yolk when you cut into it.
Place onto your plate and serve with the crisp herbs, parmesan, olive oil and salt.
Alternatively serve as an element to a dish.

Easter Recipe Pickle Fish – by Chef Jaco Page
Ingredients
- 1kg hake portions
- 6 medium onions
- 140ml sugar
- 20 ml turmeric
- 55ml hot curry powder
- 20ml salt
- 5ml whole peppercorns
- 4 bay leaves
- 4 lemon leaves
- 300ml water
- 700ml vinegar
Method
- Bake hake portions in the oven at 180 C for 25 Min or until lightly brown.
Preparing the pickle sauce:
- Slice the onions very finely
- In a large sauce pot add all the ingredients together and bring to boil then add the onions and cook until soft about 30 min.
- Add fish into sauce and cool down properly before refrigerating.
- Refrigerate for 48 hours to ensure the pickle sauce pulls into the fish.
- Serve hot or cold.
Royal Iced Cookies by Chef Bernice Warner
For the sugar cookies:
- 400g cake flour
- 1 medium egg
- 200g butter or baking margarine
- 200g castor sugar
- 5ml vanilla essence
Method
- Cream the butter and sugar until light pale and fluffy in a stand mixer or bowl with an electric hand mixer.
- Add the beaten egg and vanilla essence until well combined.
- Mix in the flour until a dough ball forms.
- Wrap in plastic wrap and set to chill in the fridge for 20min before rolling out.
- Pre- heat oven to 200’C.
- Roll out on a lightly floured surface the chilled dough to about ½ cm and with assorted cookie cutters cut out shapes and place on a prepared and lined baking tray. Allow space in between the cookies during baking as they bake better that way.
- Bake for +- 15minutes or until golden around the edges. Remove and cool on a cooling rack until ready to decorate with the Royal icing.
Royal icing
- 1 egg white
- 400-500g sieved icing sugar
- 5ml lemon juice or ¼ teaspoon cream of tartar
Method
- Whip the egg white until soft peaks form on the whip attachment in your mixer bowl and start adding a half a cup of icing sugar at a time while mixing on low speed until incorporated before you add the next amount of sugar until there is no more left.
- Add the lemon juice and mix for a few minutes on high speed. The mixture will become very white and glossy. It’s now ready to use.
- Select your food colouring and divide into the amounts of colour needed to decorate your cookies
- You will need piping bags or zip lock bags for this.
- You may change the consistency of your icing with a small amount of water if too firm. Note too much water will cause the icing to run excessively.
- Allow the decorated cookie to dry for a few hours before consuming…the rest may be sealed in an air tight container.


