
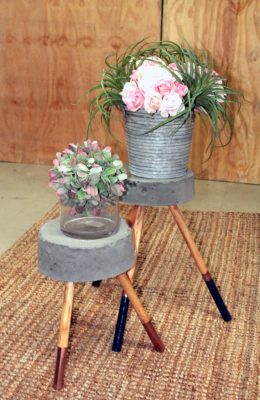
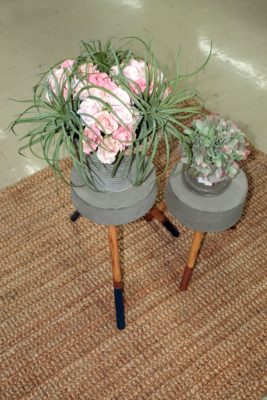
Side tables will never go out of fashion, and from the minute we saw them we fell in love with these industrial, rugged-looking concrete ones. Although they are near effortless and fairly cheap to make, and do not require great skill, these little tables are a unique addition to any space. You could make them in different sizes, use creative legs, paint them or not. They can be used as side tables in the lounge or as display ones in the bathroom. The creative possibilities really are endless.
You will need
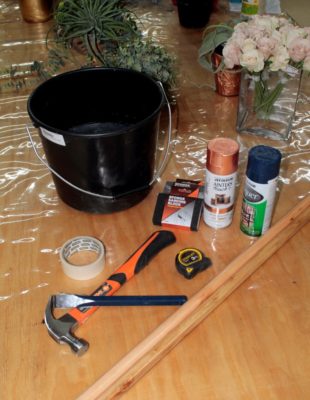
• A bucket or container of the required size
• Concrete mix
• A piece of thick cardboard, cut from a box
• Wooden rake or broom handles – BUCO has different lengths available which can be sawed to the required lengths
• Wood saw
• Hammer and chisel
• Sponge sanding blocks of different coarseness
• Tape measure
• Masking tape
• Spray paint – we used Rust Oleum Painter’s Touch metallic copper and Rust Oleum Lacque navy. You can also use wood stain or varnish.
How to
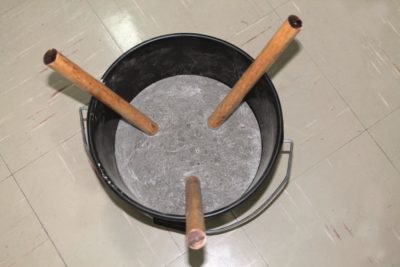 1 Mix the concrete mix in a separate container as per the instructions on the bag. It must not be too runny.
2 If there is a logo embedded on the bucket’s bottom, you could add the piece of thick cardboard in order to prevent the words from being impressed on the table’s top.
3 Now cast the concrete to the required thickness.
4 Next it is time to saw the broom or rake handles to the right sized table legs. We used three legs, but you can also use four.
5 Stick the legs into the concrete mix and balance them against the sides of the bucket. It is important that the legs should be spaced evenly to avoid one being longer or shorter than the others.
6 The concrete must dry completely before the table is removed from the bucket.
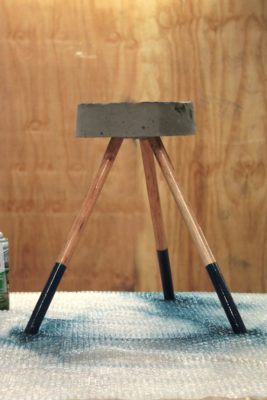
7 Remove the cardboard.
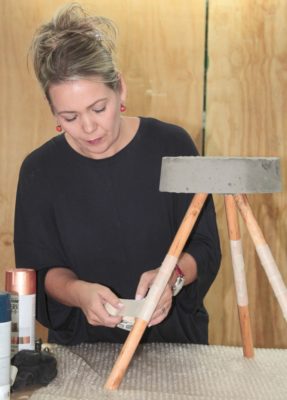
8 Use the hammer and chisel to neaten the sides of the tabletop.
9 Next sand the top so that it is as smooth as you like. We chose a rustic look, and only sanded away the most rugged edges.
 10 You can either leave the legs as is, stain the wood if it has not been stained yet, or paint it. We chose to paint the lower half of the legs in two different colours.
11 Measure the lines where the colours should be applied and use masking tape to protect the parts that should not be painted in that specific colour.
12 It is important to give the paint time to dry properly between layers; otherwise it will just come off when the masking tape is removed.
13 Now for the difficult part: choose where to put the table, preferably in a place where it will catch the eye. Choices, choices, choices…
GET IN TOUCH
Get it has collaborated with BUCO on this project. All of the components needed to successfully build a concrete table are available at the Mbombela store. Just ask to see Celia Swart at the decor section. She is always ready to provide valuable advice and tips should they be needed.

